Apidog Docs
πŸ‡ΊπŸ‡Έ English
  • πŸ‡ΊπŸ‡Έ English
  • πŸ‡―πŸ‡΅ ζ—₯本θͺž
HomeLearning CenterSupport CenterAPI References
Discord Community
Slack Community
X / Twitter
πŸ‡ΊπŸ‡Έ English
  • πŸ‡ΊπŸ‡Έ English
  • πŸ‡―πŸ‡΅ ζ—₯本θͺž
  1. Schemas
  • Apidog Learning Center
  • Get started
    • Introduce Apidog
    • Basic concepts in Apidog
    • Navigating Apidog
    • Quick Start
      • Overview
      • Specify a new endpoint
      • Make a request to the endpoint
      • Add an assertion
      • Create a test scenario
      • Share your API documentation
      • Explore more
      • Send a request and save as an endpoint
    • Migration
      • Overview
      • Manual import
      • Scheduled import
      • Import options
      • Export data
      • Import from...
        • Import from Postman
        • Import OpenAPI (Swagger) spec
        • Import cURL
        • Import Markdowns
        • Import from Insomnia
        • Import from apiDoc
        • Import .har file
        • Import WSDL
  • Design APIs
    • Overview
    • Create a new API project
    • Endpoint basics
    • Components
    • Common fields
    • Global parameters
    • Endpoint change history
    • Batch endpoint management
    • Configure multiple request body examples
    • Schemas
      • Generate Schemas from JSON etc.
      • Build a schema
      • Overview
      • Create a new schema
    • Security schemes
      • Overview
      • Create a security scheme
      • Use the security scheme
      • Security scheme in online documentation
    • Advanced features
      • Custom endpoint fields
      • Import endpoints as test steps
      • Endpoint status
      • Appearance of parameter lists
      • Endpoint unique idenfication
  • Develop and Debug APIs
    • Overview
    • Generate requests
    • Send requests
    • Endpoint cases
    • Dynamic values
    • Validate responses
    • Design-first Mode & Request-first Mode
    • Generate code
    • Environments & variables
      • Overview
      • Using variables
      • Environments & services
    • Vault secrets
      • Overview
      • HashiCorp Vault
      • Azure Key Vault
      • AWS Secrets Manager
    • Pre/Post processors
      • Overview
      • Assertion
      • Extract variable
      • Wait
      • Database operations
        • Overview
        • MongoDB
        • Redis
        • Oracle Client
      • Using scripts
        • Overview
        • Postman scripts reference
        • Pre processor scripts
        • Post processor scripts
        • Public scripts
        • Calling other programming languages
        • Using JS libraries
        • Visualizing responses
        • Script examples
          • Assertion scripts
          • Using variables in scripts
          • Using scripts to modify request messages
          • Other examples
    • Dynamic values Modules
  • Mock API data
    • Overview
    • Smart mock
    • Custom mock
    • Mock priority sequence
    • Mock scripts
    • Cloud mock
    • Self-hosted runner mock
    • Mock language (Locales)
  • Automated tests
    • Overview
    • Test reports
    • Test scenarios
      • Create a test scenario
      • Pass data between requests
      • Flow control conditions
      • Import endpoints/endpoint cases from other projects
      • Sync data from endpoints/endpoint cases
      • Export test scenarios
    • Run test scenarios
      • Run a test scenario
      • Data-driven testing
      • Run test scenarios in batch
      • Scheduled tasks
      • Manage the runtime environment of APIs from other projects
    • Test APIs
      • Integration testing
      • Performance testing
      • End-to-end testing
      • Regression testing
    • Apidog CLI
      • Overview
      • Installing and running Apidog CLI
      • Apidog CLI Options
    • CI/CD
      • Overview
      • Integrate with Jenkins
      • Integration with Gitlab
  • Publish API Docs
    • Overview
    • API Technologies Supported
    • Quick share
    • View the API documentation
    • Publish docs sites
    • Folder tree settings
    • Custom layouts
    • Visibility settings
    • Endpoint SEO settings
    • Custom domain
    • Embedding values in document URLs
    • Documentation Search
    • Integrating Google Analytics with Doc Sites
    • CORS Proxy
    • API Versions
      • Overview
      • Create API versions
      • Publish API versions
      • Share endpoints with API versions
  • Send requests
    • Overview
    • gRPC
    • Use request proxy agents for debugging
    • SOAP/WebService
    • GraphQL
    • WebSocket
    • Socket.IO
    • SSE debugging
    • Create requests
      • Request History
      • Request basics
      • Parameters and body
      • Request headers
      • Request settings
      • HTTP/2
    • Authentication and authorization
      • Overview
      • CA and client certificates
      • Authorization types supported by Apidog
      • Digest Auth
      • OAuth 1.0
      • OAuth 2.0
      • Hawk Authentication
      • Kerberos
      • NTLM
      • Akamai EdgeGrid
    • Response and cookies
      • Overview
      • API response in Apidog
      • Create and send cookies
      • Debug requests
      • Save the request as an endpoint
  • Branches
    • Overview
    • Create a new sprint branch
    • Test APIs in a branch
    • Design API in a branch
    • Merge sprint branches
    • Manage sprint branches
  • Apidog MCP Server
    • Overview
    • Conntect API Specification within Apidog Project to AI via Apidog MCP Server
    • Conntect Online API Documentation Published by Apidog to AI via Apidog MCP Server
    • Conntect OpenAPI Files to AI via Apidog MCP Server
  • Best practices
    • How to handle API signatures
    • How to access OAuth 2.0 protected APIs
    • Apidog collaboration workflow
    • Managing authentication state in Apidog
  • Administration
    • Onboarding Checklist
      • Basic Concepts
      • Onboarding Guide
    • Managing Teams
      • Managing Teams
      • Managing Team Members
      • Member Roles & Permission Settings
      • Team Activities
      • Team Resources
        • General Runner
        • Team Variables
        • Request Proxy Agent
      • Real-time Collaborations
        • Team Collaboration
    • Managing Projects
      • Managing Projects
      • Managing Project Members
      • Notification Settings
      • Project Resources
        • Database Connection
    • Managing Organizations
      • Single Sign-On (SSO)
        • SSO Overview
        • Configure Microsoft Entra ID
        • Configure Okta
        • Configure SSO for an Organization
        • Managing user accounts
        • Mapping Groups to Teams
      • SCIM Provisioning
        • Intro to SCIM Provisioning
        • Microsoft Entra ID
        • Okta
      • Organization Resources
        • Self-hosted Runner
  • Billing
    • Overview
    • Credits
    • Unable to use credit cards?
    • Managing subscriptions
    • Upgrade plan
  • Add-ons
    • API Hub
    • Apidog Intellij IDEA plugin
    • Browser Extension
      • Chrome
      • Microsoft Edge
    • Request Proxy
      • Request proxy in Apidog web
      • Request proxy in shared docs
      • Request proxy in Apidog client
  • Account & preferences
    • Language settings
    • Data backup
    • Network proxy configuration
    • Hot keys
    • Updating Apidog
    • Generate OpenAPI access token
    • Deleting account
    • Account settings
  • References
    • API-Design First Approach
    • Apidog OpenAPI/Swagger Specificaiton Extensions
    • JSONPath
    • XPath
    • Regular Expressions
    • JSON Schema
    • CSV File Format
    • Install Java Environment
    • Runner deployment environment
    • Apidog flavored Markdown
  • Apidog Europe
    • Apidog Europe
  • Support Center
  1. Schemas

Build a schema

Utilize the Schema Editor#

The Schema Editor is a powerful tool that aids in designing and modeling the data structures your API utilizes.It is based on JSON Schema and is utilized for designing JSON or XML data structures.
Utilize the Schema Editor to:
Develop API request and response bodies tailored for specific API endpoints.
Construct data models that are applicable across one or several APIs.
Every schema begins with a root object. To build a Schema, add properties to this root object.
To construct a schema:
1
Add Properties
Click on the + (Add a child node) sign next to the root object to introduce new properties.
2
Name Your Property
Enter the name (or key) for the property.
3
Select Property Type
Choose common data types or select references to predefined schemas.
4
Advanced Settings
Utilize the Type Editor to assign data types, such as default values and formats, for each property.
5
Manage Properties
Rearrange properties by moving, copying, or deleting them. You can also embellish properties with descriptions and mark them as required.
You can also create new schemas by importing from database tables or JSON schema files. Learn more about Generate Schemas from JSON etc..

Property type#

In alignment with the JSON Schema standard, the Apidog Schema Editor supports the following basic data types:
null: Represents a JSON "null" value.
boolean: Represents a "true" or "false" value, corresponding to the JSON "true" or "false" value.
object: Represents an unordered collection of key-value pairs, corresponding to the JSON "object" value.
array: Represents an ordered list of values, corresponding to the JSON "array" value.
When using the array data type, an sub-level ITEMS property will be automatically generated. It specifies the data type of the elements within the array.
number: Represents an arbitrary-precision, base-10 decimal number value, corresponding to the JSON "number" value.
string: Represents a string of Unicode characters, corresponding to the JSON "string" value.
In addition to the standard data structures mentioned earlier, the Apidog Schema Editor also supports the following:
Reference other Schemas: Ability to reference and reuse schemas defined elsewhere within the API documentation.
any: Represents a value that can be of any data type.
Schema Composition: Allows for combining multiple schemas to create complex data structures.
Customization: Enables users to customize and tailor the schema to meet specific requirements and data modeling needs.

Reference other Schemas#

You can utilize the "Reference other schemas" feature to reference previously defined schemas.
After referencing another schema, you can view the referenced schema in the Schema Editor.
Any modifications made to the original schema will be reflected in the referencing schema.
The referenced schema cannot be directly edited; to make changes, you can:
Click the schema name to navigate to the original schema to edit.
By clicking Dereference on the schema, the schema will transform into a series of independent properties, allowing you to edit them individually.
If you need to modify a specific property's definition independently, you can choose to Dereference that property, allowing for individual modifications. Any changes to the original schema will not affect the dereferenced property.
In cases where not all properties of the referenced schema are required in the endpoint, you can click Hide to conceal unnecessary properties.

Schema Composition#

If a property in your data structure can have multiple possible data types, you can use Schema Composition to combine multiple schemas.
Apidog supports the following composition keywords:
allOf(AND): Specifies that the property must adhere to all the schemas defined in the composition.
anyOf(OR): Specifies that the property can conform to any of the schemas listed in the composition.
oneOf(XOR): Specifies that the property must adhere to one and only one of the schemas defined in the composition.
After selecting Schema Composition, sub-properties named "0" and "1" will appear under the property, representing each schema within the composition. You can modify the schema type for each sub-property and add additional schemas as needed.
In the API documentation, Schema Composition will be displayed like this:
You'll notice the two optional objects under OneOf. If you want to display their names as shown in the image, you need to enter the names in the title field in the Type editor.

Customization#

By choosing "Customize," you can directly edit the JSON Schema within the editor.

Property settings#

For each Property, there are several buttons located next to the data type:
image.png
*: Indicates if the property is required.
N: Specifies if the property allows for null values.
Settings: Allows you to edit advanced settings in the Type Editor.

Type Editor#

The Type Editor visually describes a property in alignment with JSON Schema.
Once these Advanced settings are configured, they will take effect in the following areas:
1.
When adding response examples, you can click to auto-generate based on the settings.
2.
They will be displayed in the API documentation.
3.
In the request body, you can click to auto-generate based on the settings.
4.
Upon sending a request, the returned data will be automatically validated against the settings.
5.
In the mock service, response data will be generated based on the settings.

Enumerated property#

For String, Integer, and Number types, Apidog supports enum. By toggling the enum switch, you can add enum values and descriptions. Additionally, you can perform Bulk Edit for enum values.

Mock#

In addition to the Advanced settings in the Property, you can specify mock content for fields by filling in mock values. Mock values take precedence over the settings in Advanced settings.
Mock values support Faker.js syntax, allowing you to choose the desired faker data directly from the dropdown options.
Mock values can also be entered as fixed values.

XML Settings#

For XML data, the Type Editor in Apidog offers additional XML Settings. You can enable the XML switch, configure properties such as tag name, namespace, etc., and preview the corresponding XML structure.

HashMap, Dictionary, Array#

HashMap, also known as Map, dictionary, or associative array. It is a collection of key-value pairs, where the key names can be any content, rather than predefined.
The OpenAPI specification supports defining a HashMap with string keys. This is done by setting the element type to object, and then using the additionalProperties keyword to specify the type of the values in the key-value pairs.
Suppose there is a user information query API, and the returned data format has the following requirements:
1.
The returned data is an object
2.
The child elements of the object are key-value pairs of a HashMap
3.
The user ID is the key, and the user information is the value
When editing the API documentation in Apidog, you can define it as follows:
Create a new schema and name it "UserProfiles"
In the "UserProfiles", specify the root node as an "object" type. Then click "Advanced Configuration", set "additionalProperties" to "Allow", and click the "Settings" button on the right.
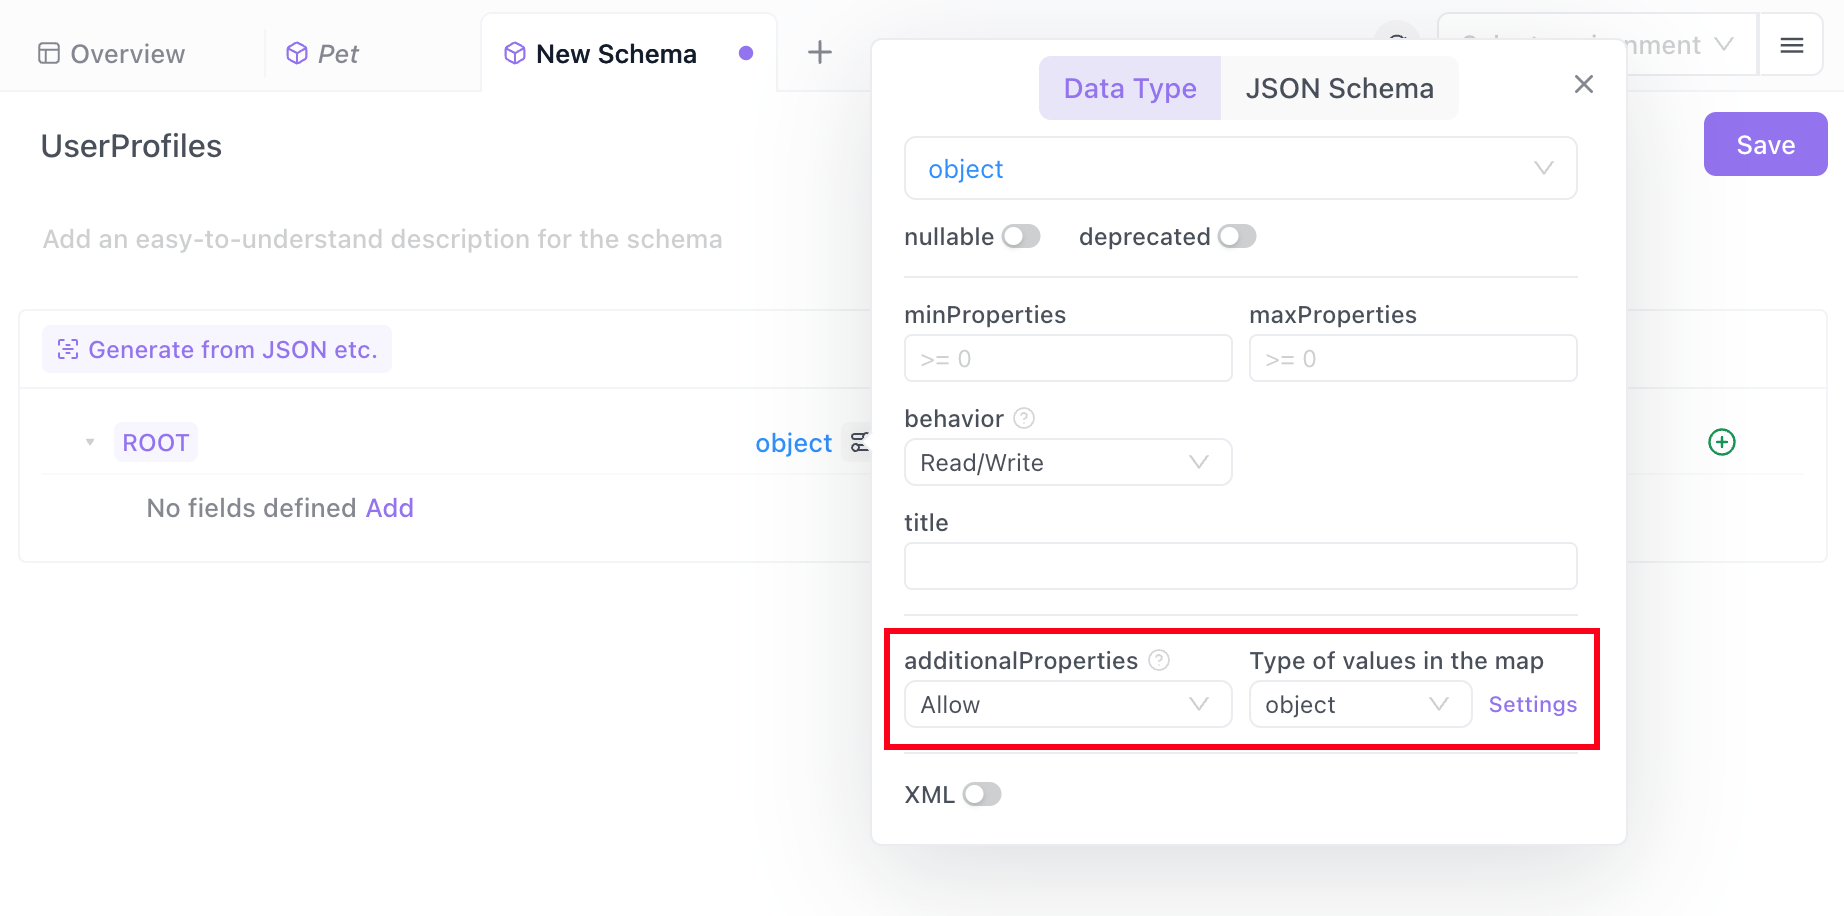
In the pop-up, add the required user information, with the user's name and email as fields of the object.It saves automatically
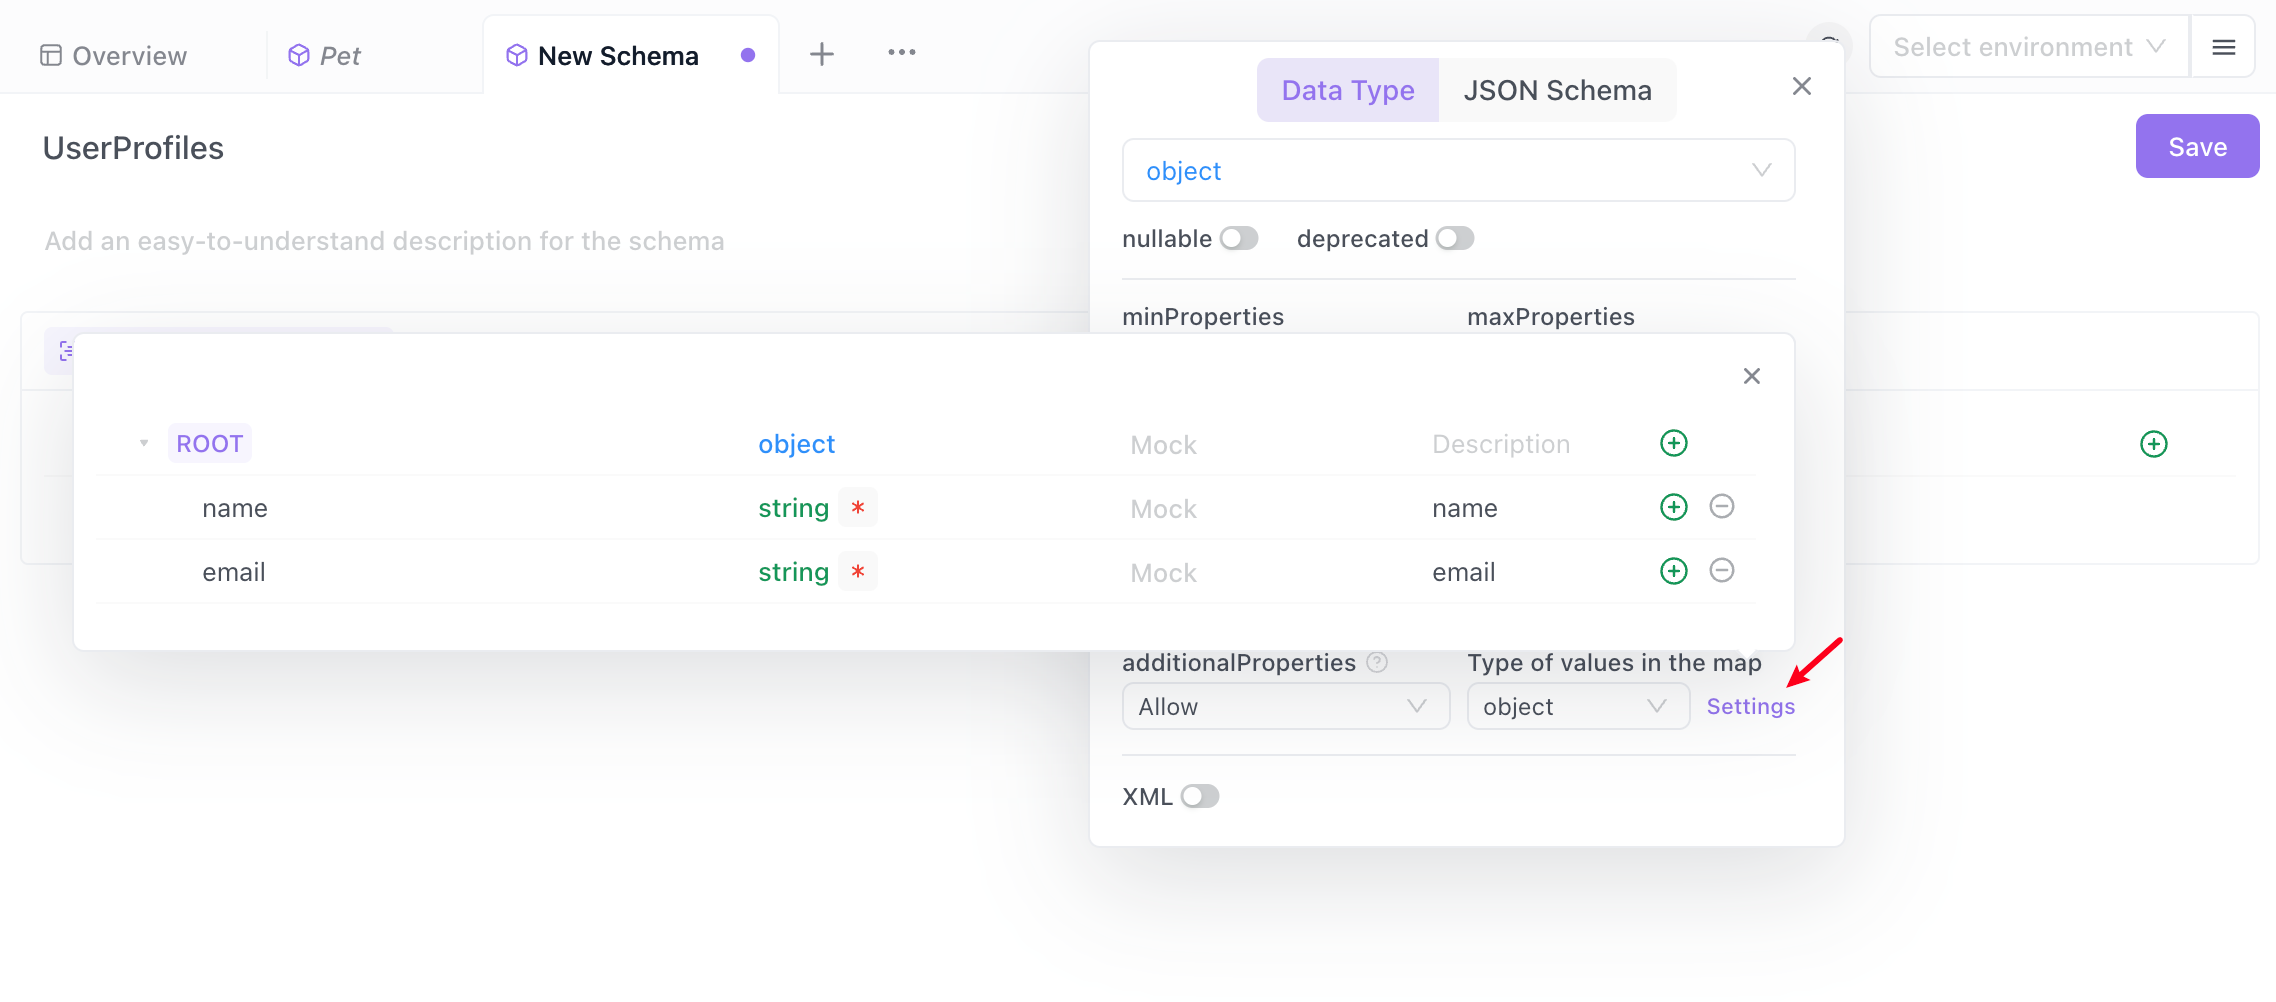
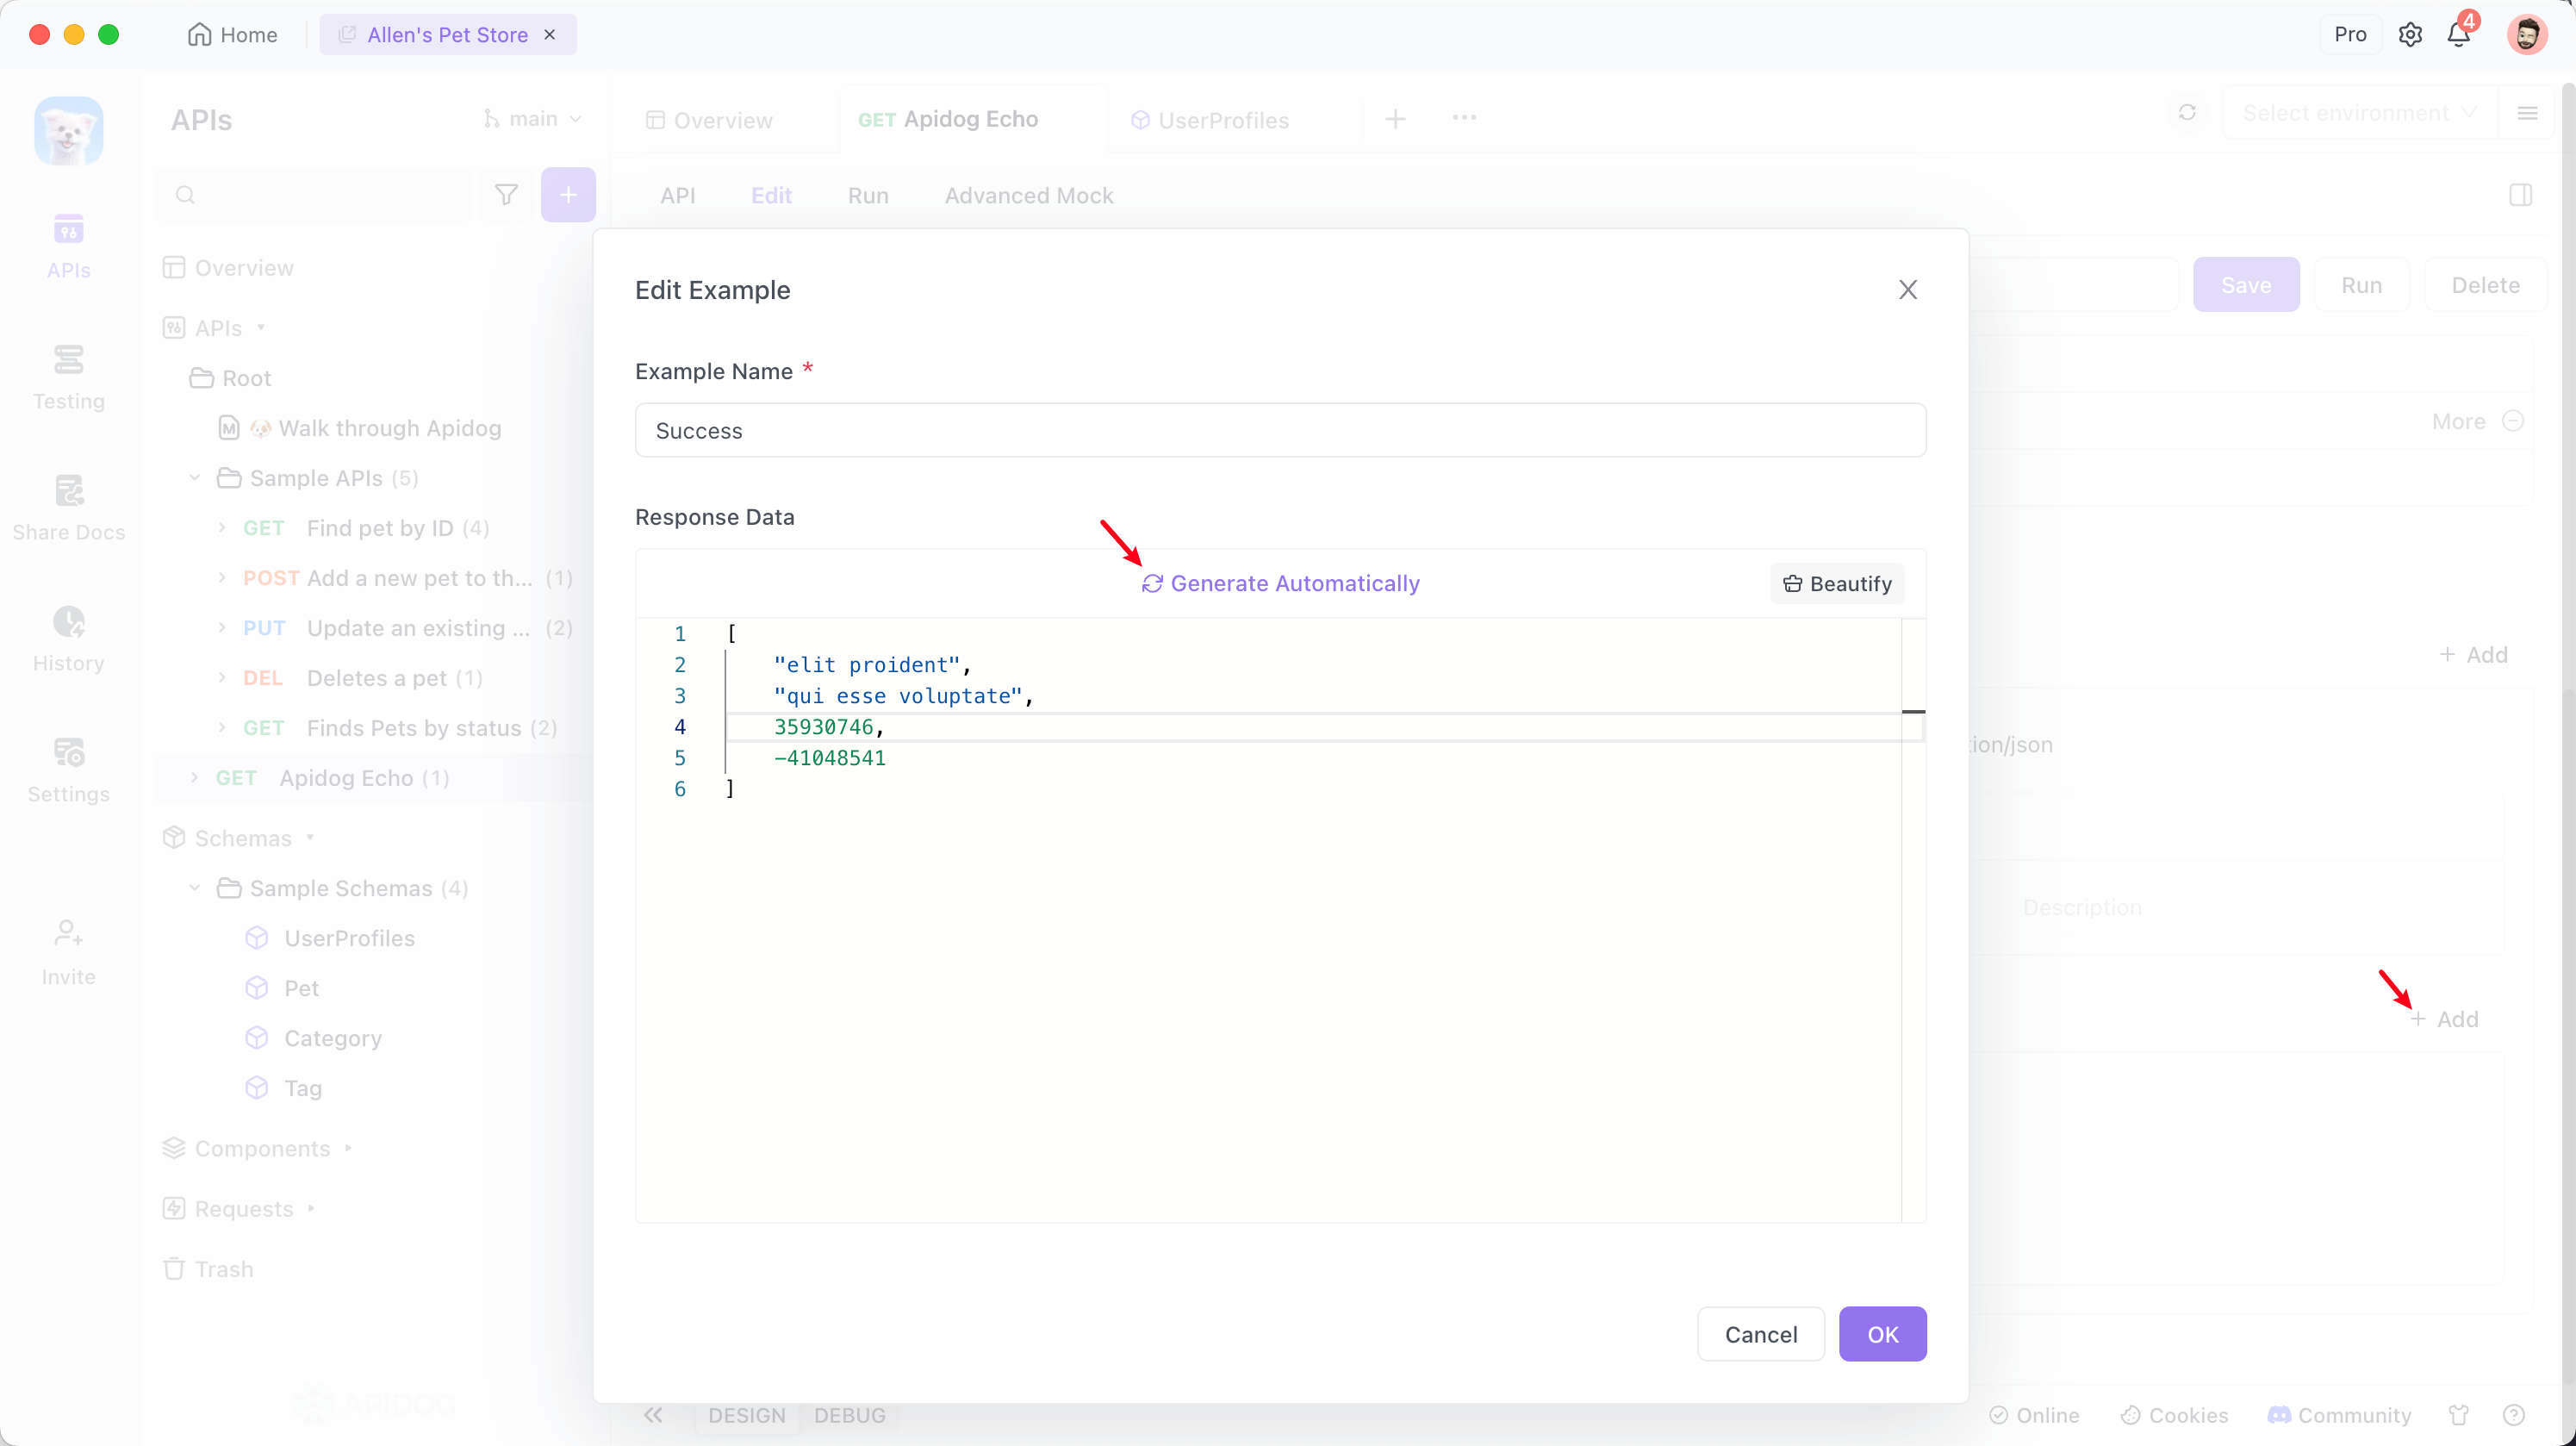
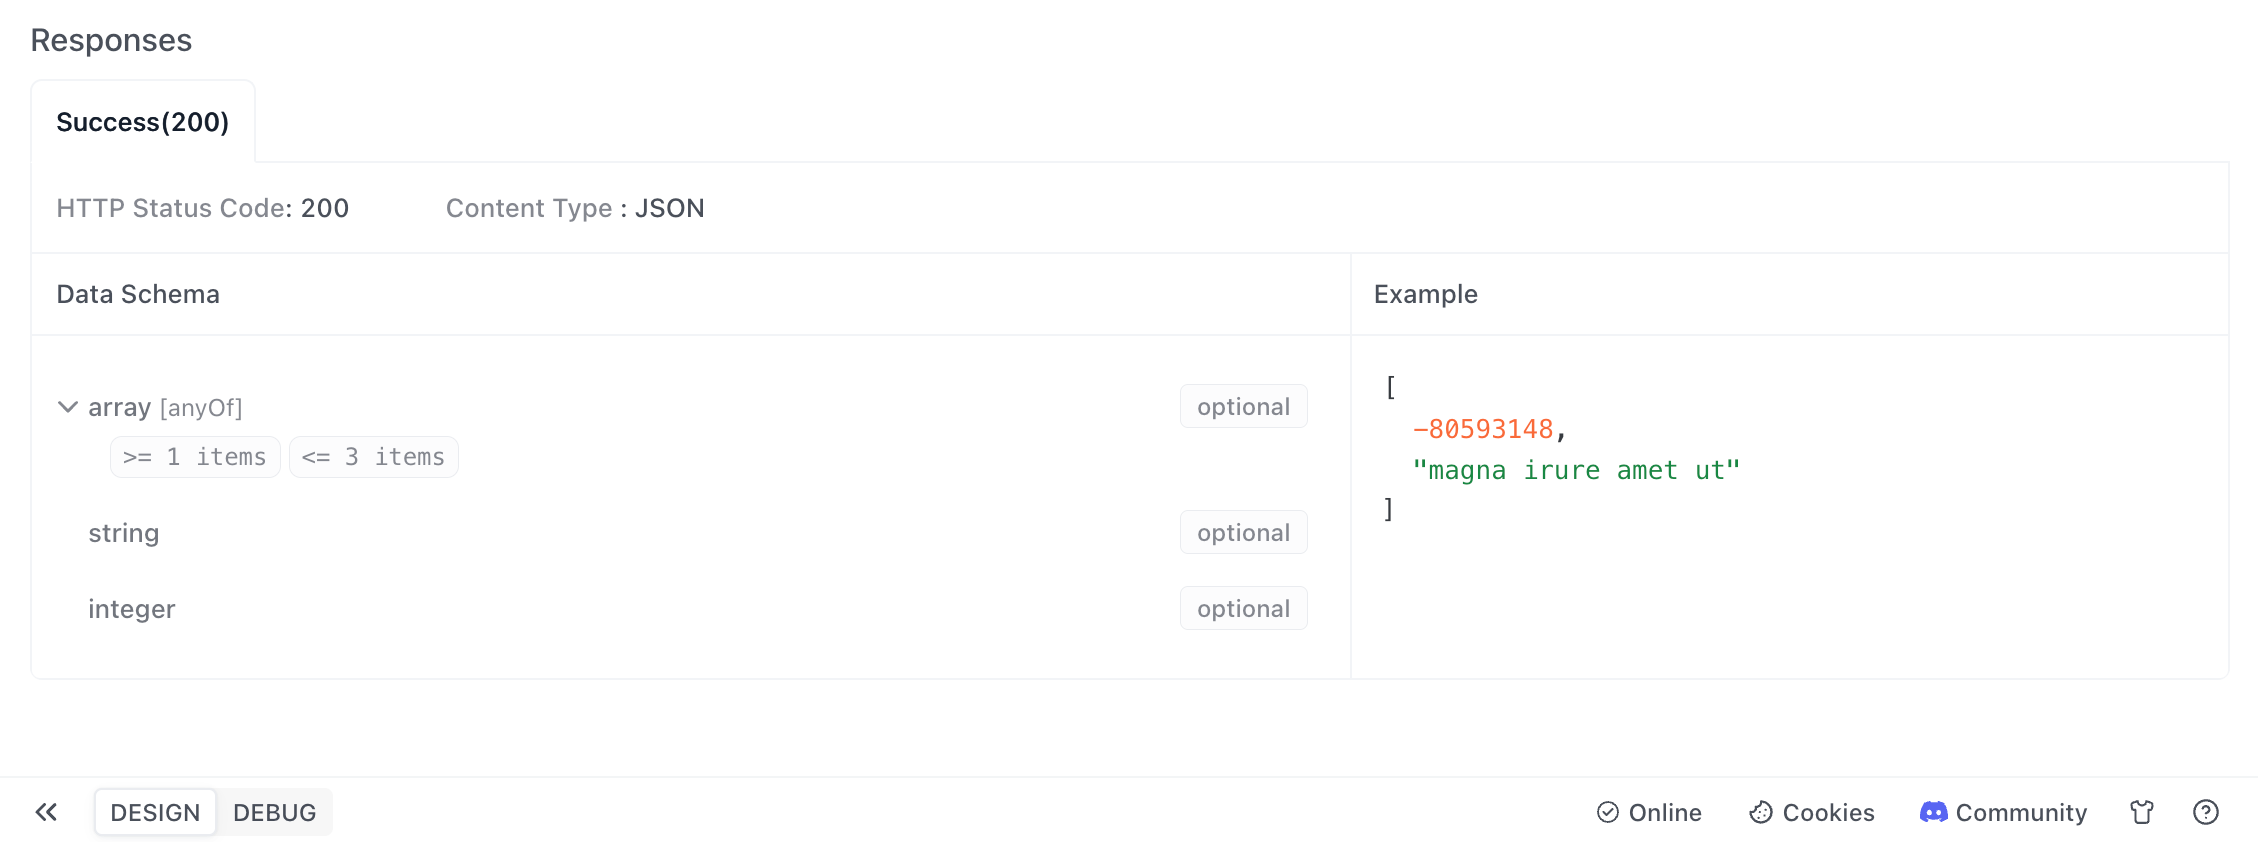
In the API documentation's responses, reference the schema at the root node and select "user profiles" that you just created.
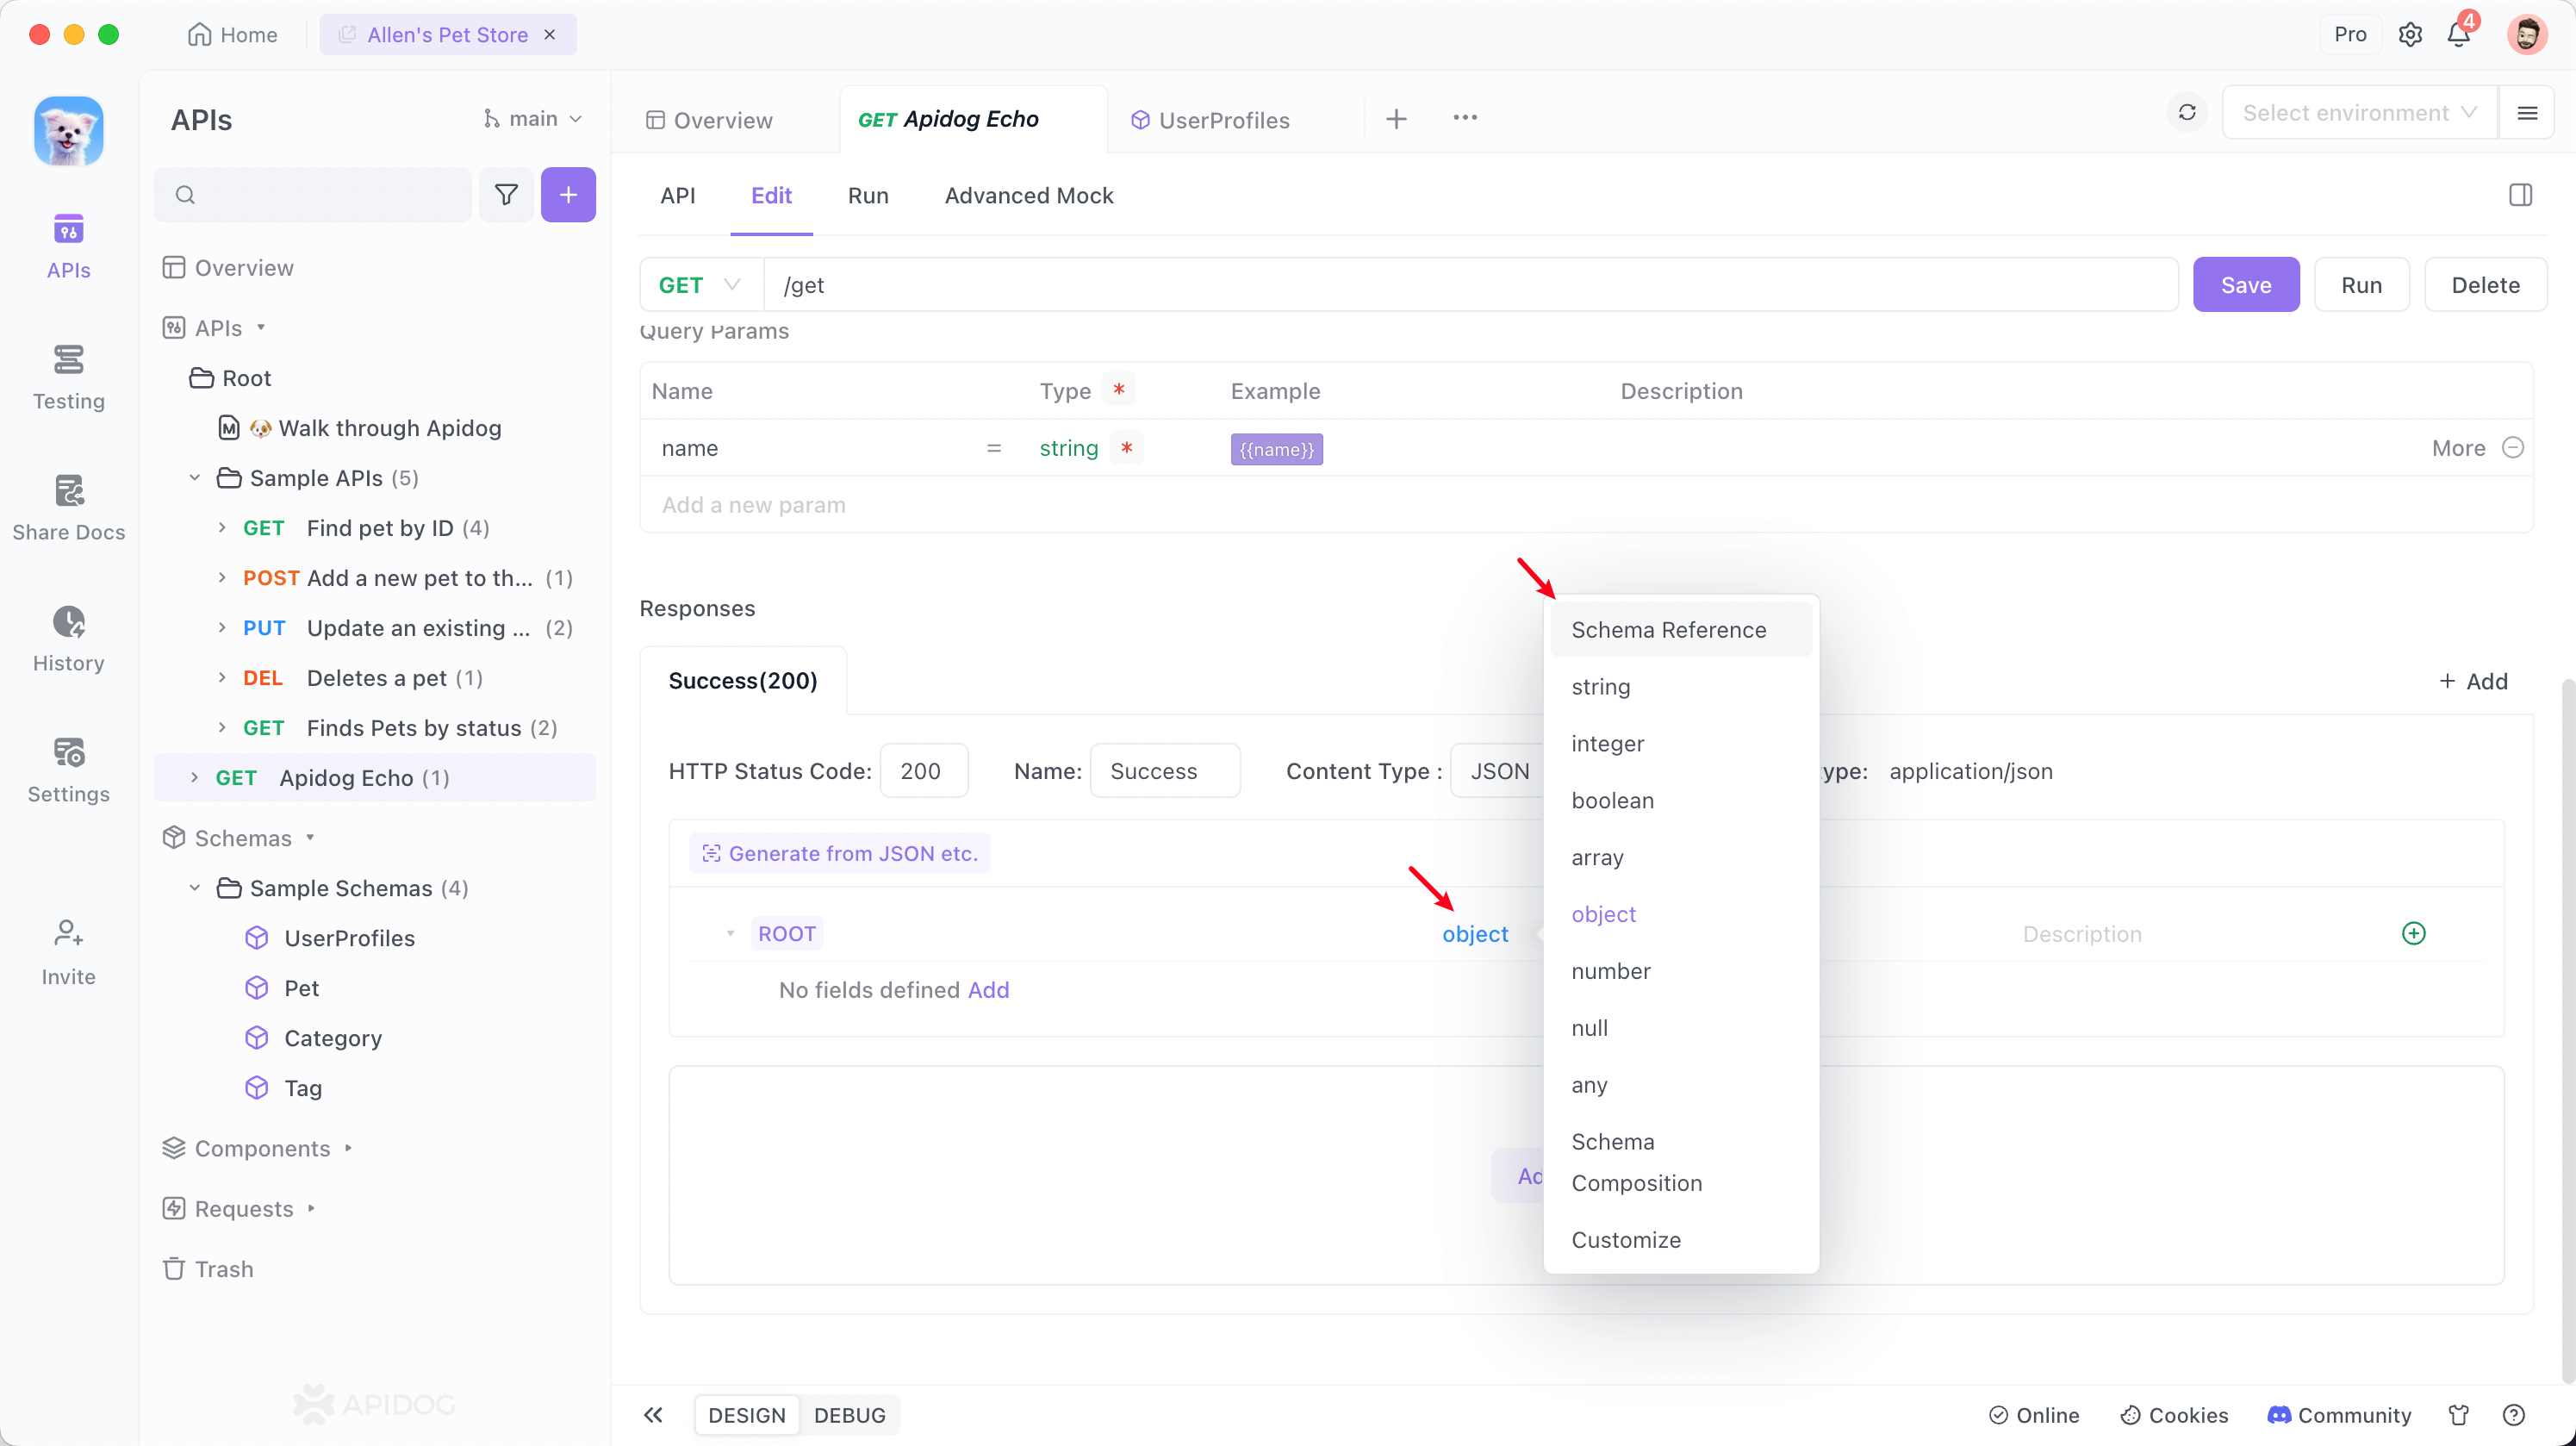
Click save, and then you can see the defined schema and example values in the return response example within the API documentation.

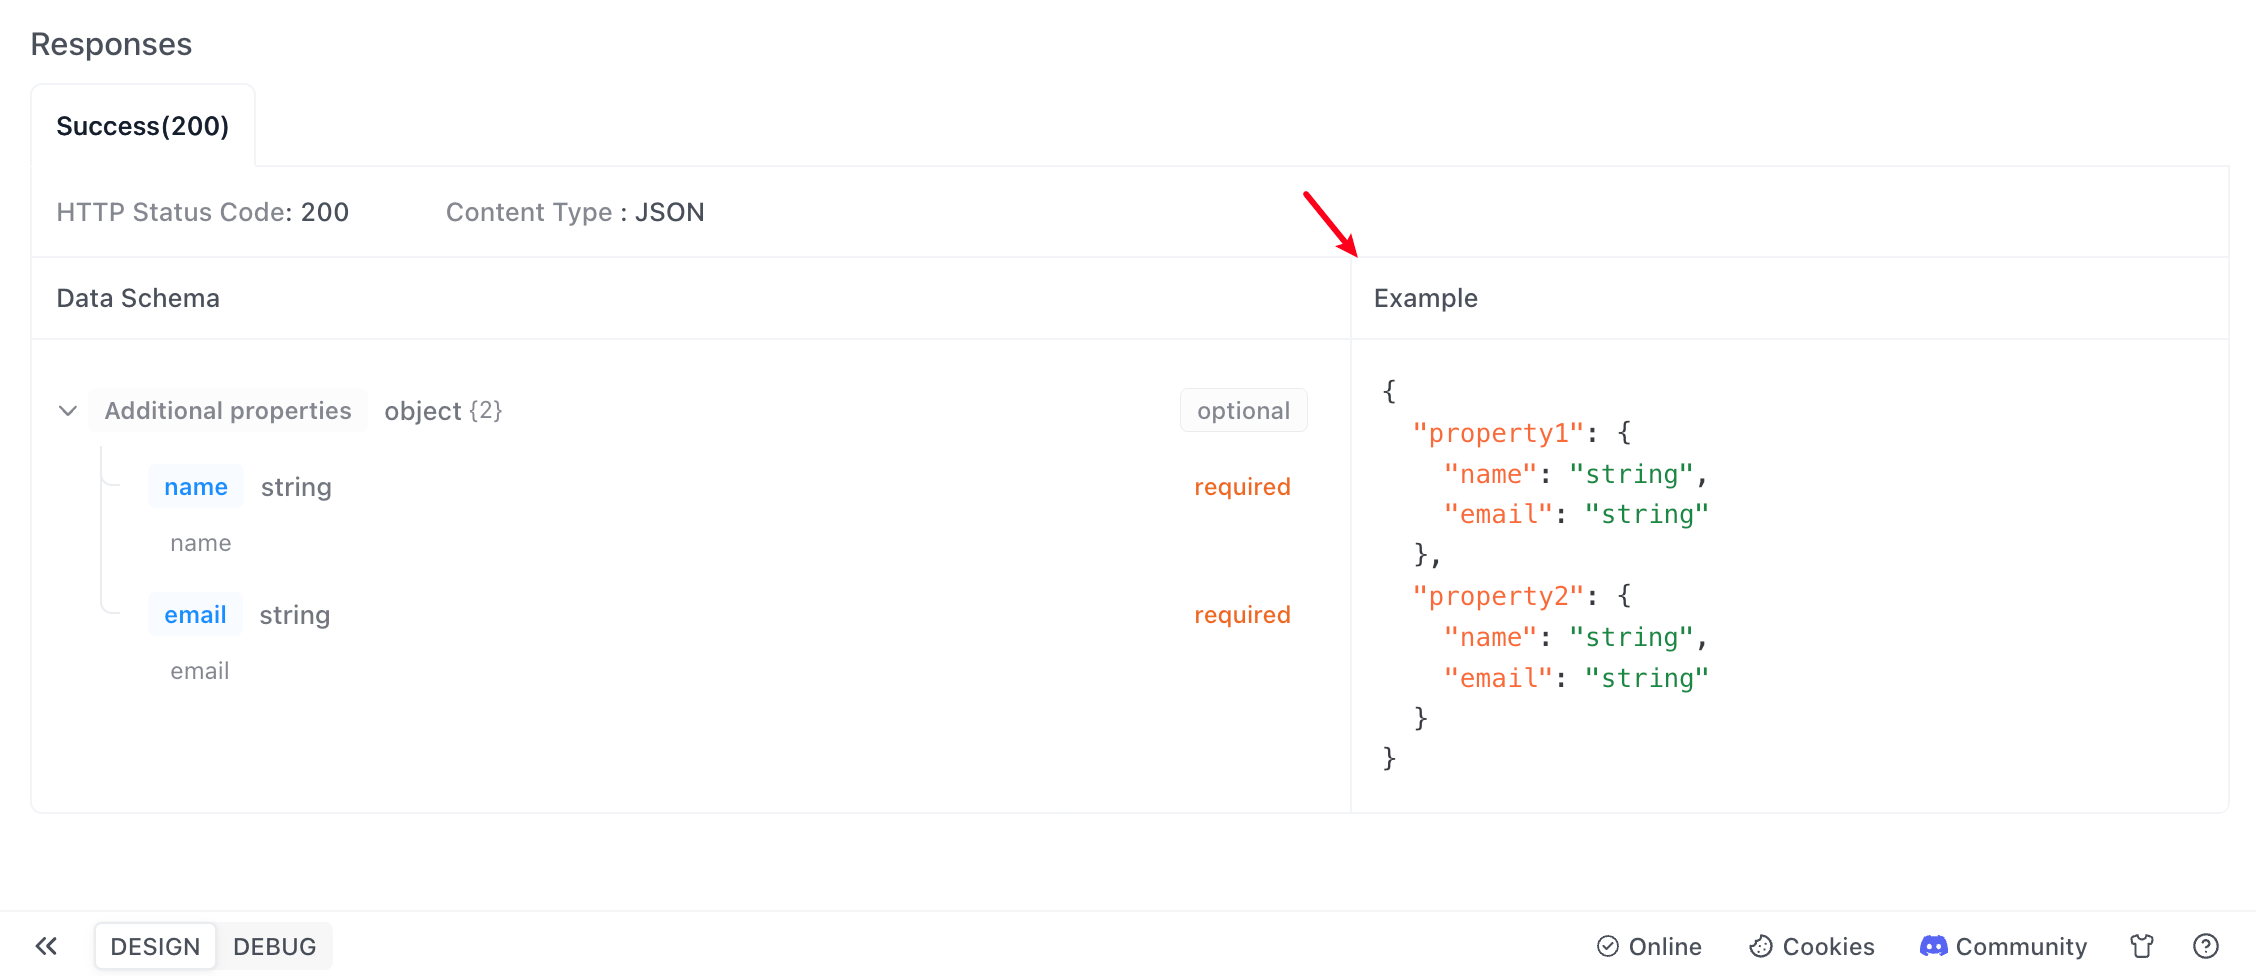
Objects with additionalProperties#

As the actual development work iterates, the objects returned by the API may have additionalProperties compared to the originally defined object. According to the OpenAPI specification, this situation can also be handled using the "additionalProperties" feature.
Suppose there is now a user information query API, where the originally defined response fields when querying user information by user ID were name and email. Now, with the system upgrade, you want to include other fields.
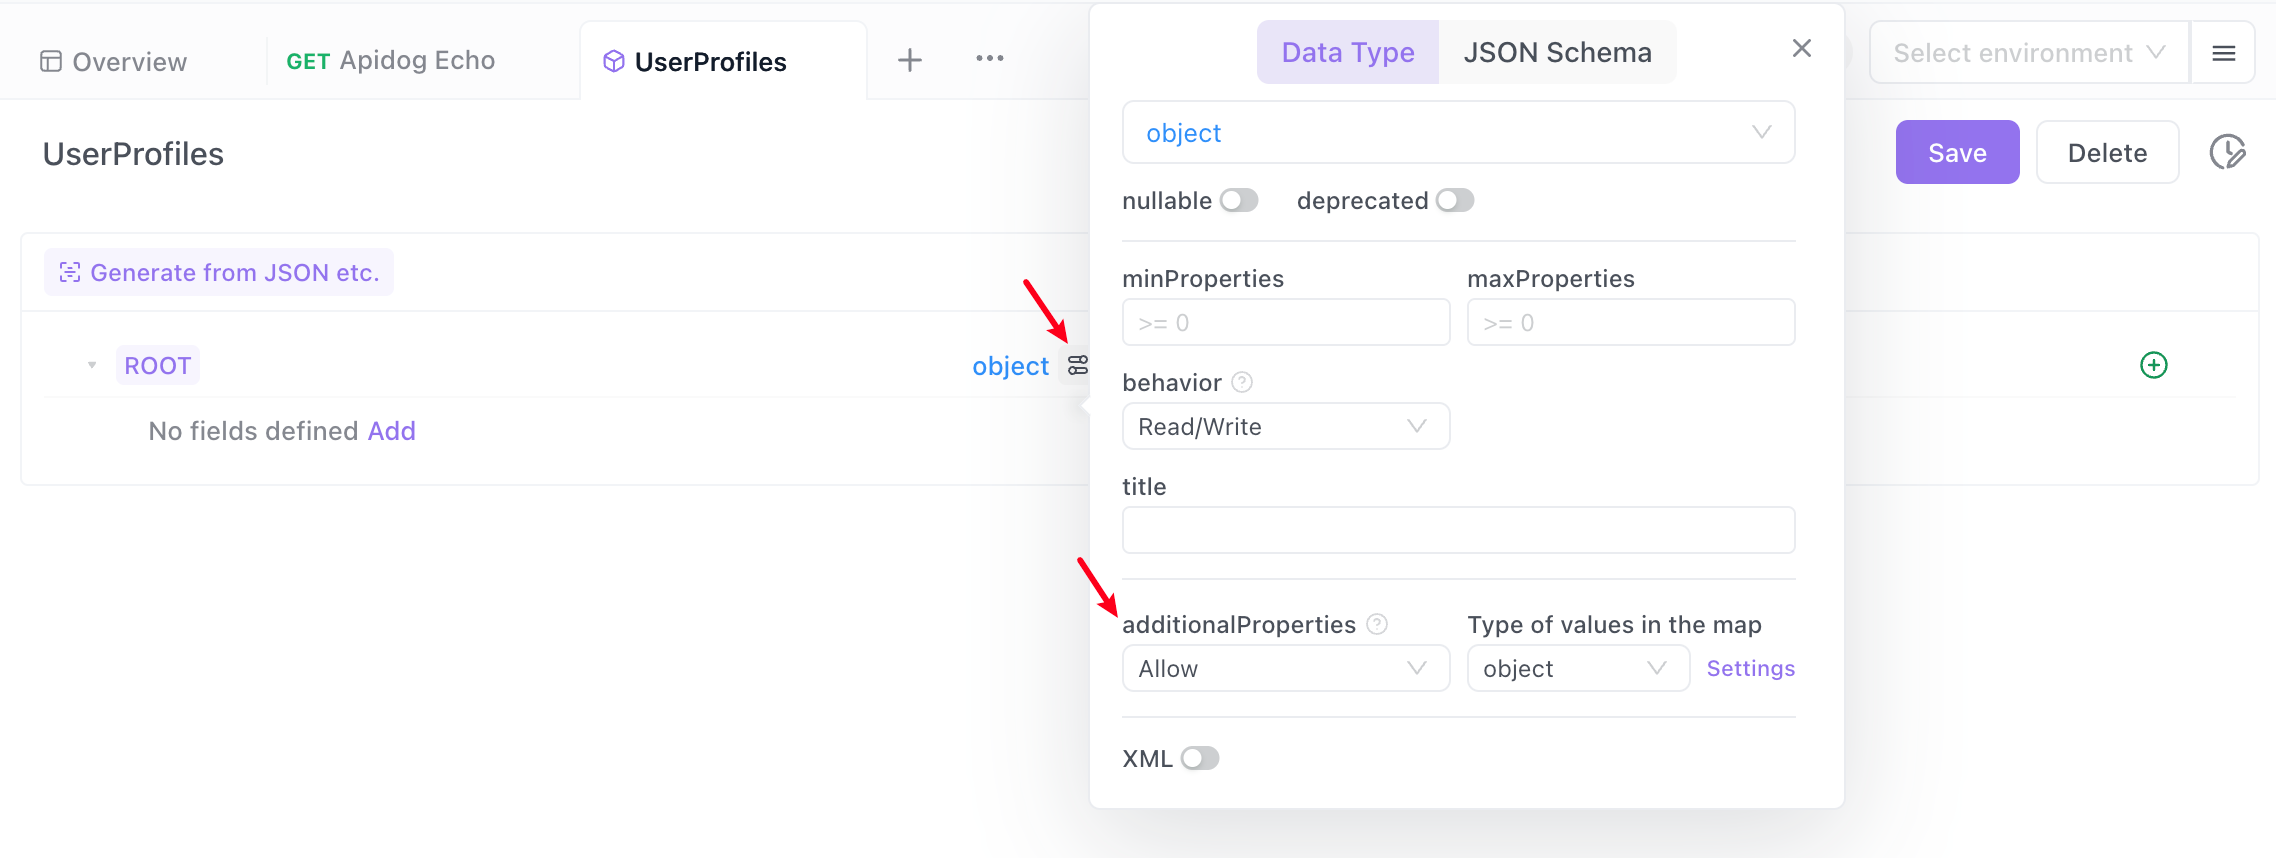
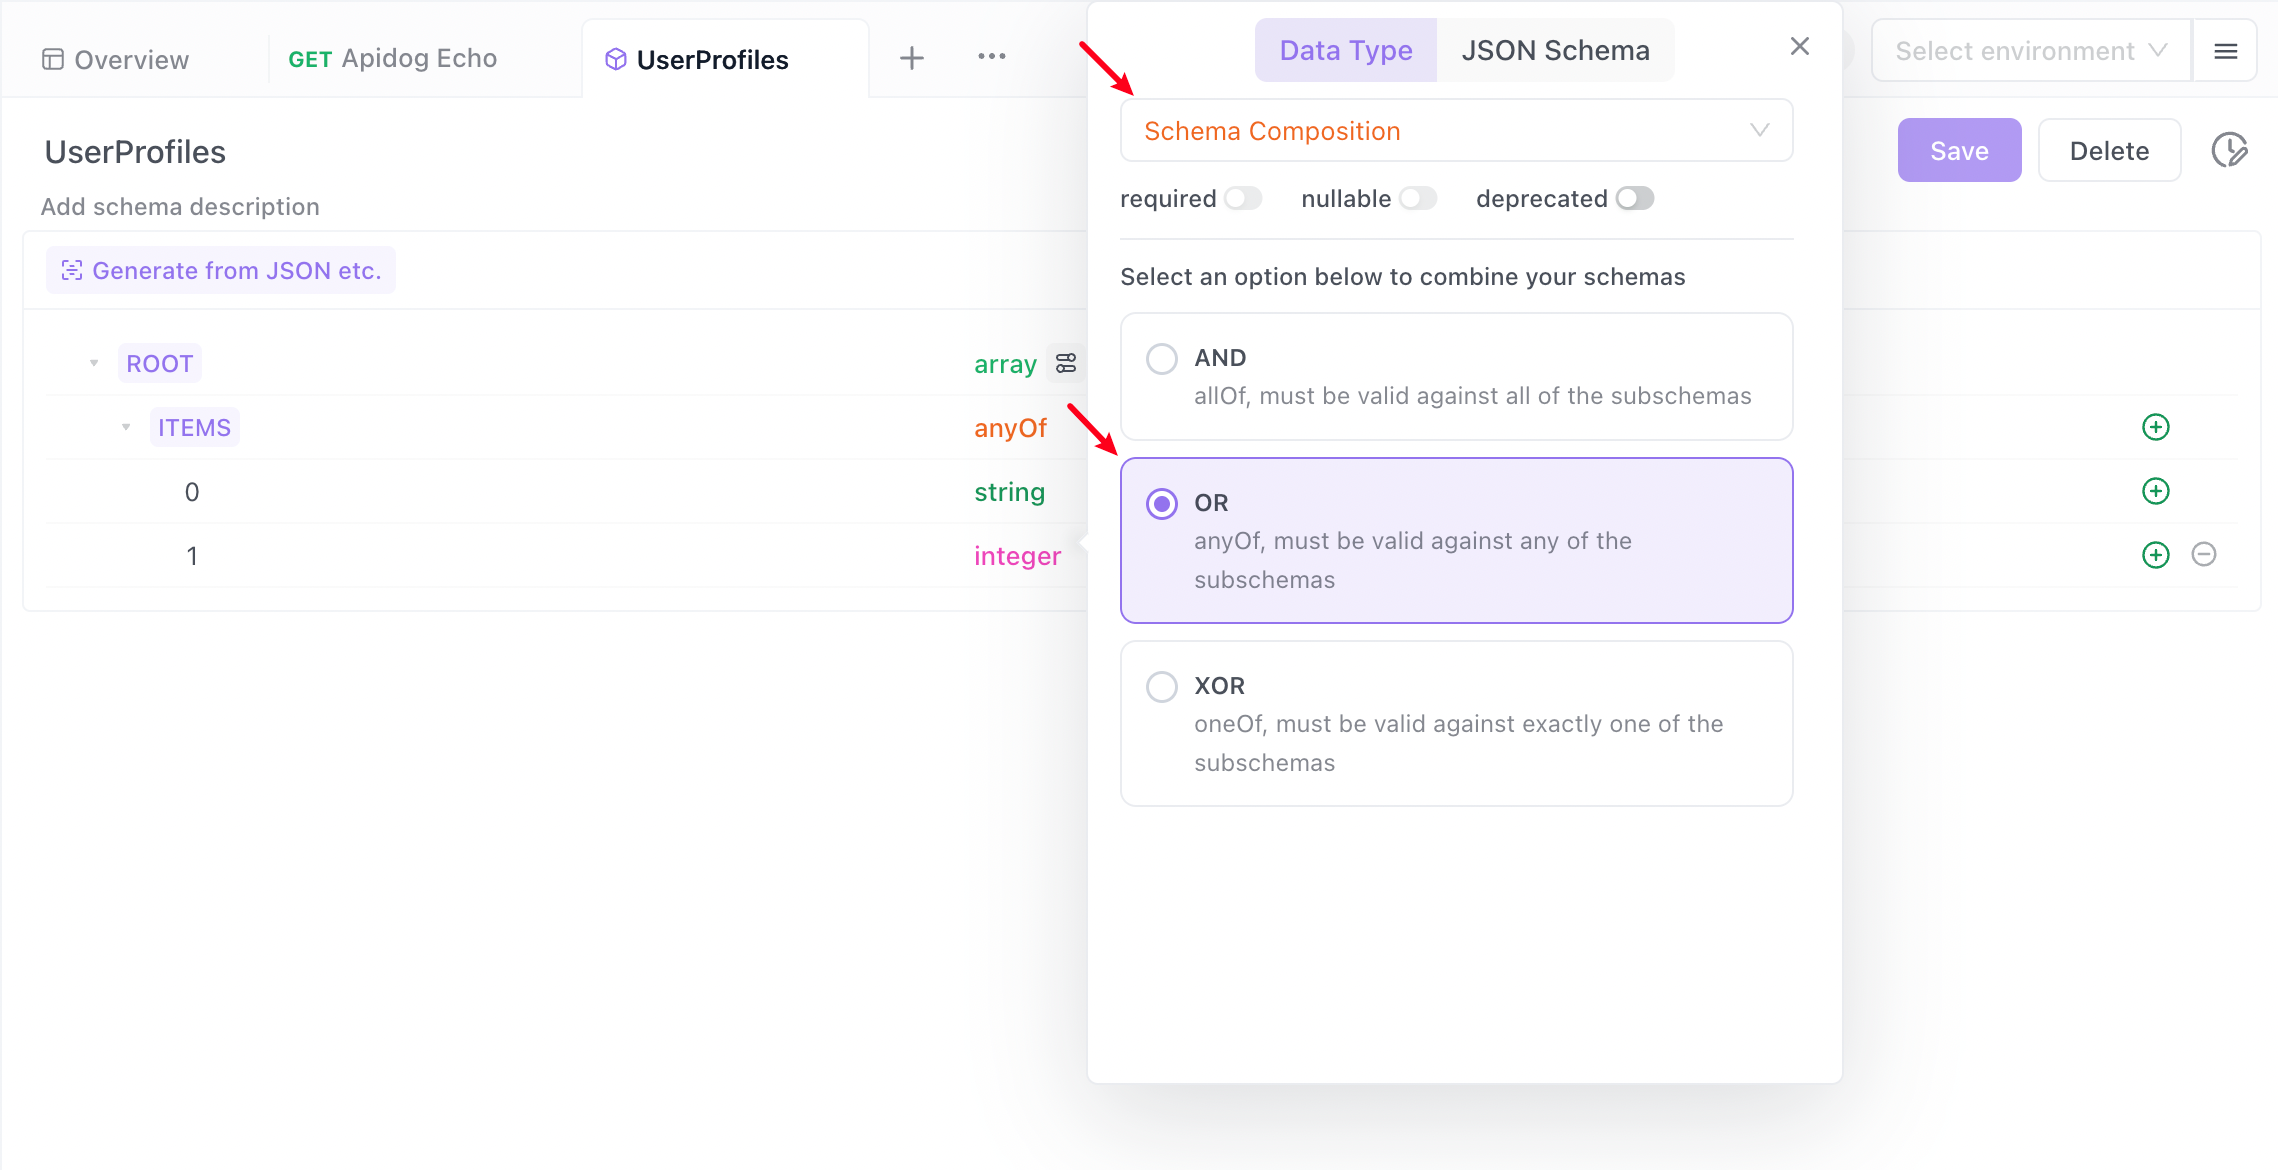
When editing the API documentation, you can define it as follows: In the root node of the data model, click "Advanced Settings", set "additionalProperties" to "Allow", and set the field value type to "any".
Then you can see the defined data structure and example values in the API documentation.

Tuples#

Typically, the internal elements of an array must be of the same type, while tuples can contain different types of data. If you want to define a tuple that includes both string and integer types, such as data like (0,"A",2,"C"), you can set the element type to array in the data model, then set the type of items to anyOf in the combination pattern, and then add child elements of type string and integer respectively.
If you want to generate multiple elements when generating examples, please specify the minimum and maximum number of elements in the advanced settings of the root node.
After saving, click "Generate Automatically" in the API documentation to see the defined data structure and example values.
You can also see the example values of the tuple in the return response in the documentation.

Tools#

The Schema Editor in Apidog provides several highly useful tools.
Generate from JSON etc.: This tool allows you to automatically generate schemas from JSON, XML data, and other sources, or directly from database table structures. Learn more about Generate schemas from JSON etc..
Preview: This tool creates mock data that adheres to the schema definition, providing a preview of the expected data.
Generate code: This tool can produce data structure definition code in various programming languages. Learn more about Generate code.
JSON Schema: This tool allows direct editing of JSON schemas for fine-tuning and customization.

FAQ#

Q: If a string property has multiple enumerated values and is used in various locations, how can this enum be consistently referenced throughout?
A: You can define this property as a standalone schema consisting of a single property, enabling it to be consistently referenced across different parts of the API documentation.
Modified atΒ 2025-04-24 02:31:40
Previous
Generate Schemas from JSON etc.
Next
Overview
Built with