Apidog Docs
πŸ‡ΊπŸ‡Έ English
  • πŸ‡ΊπŸ‡Έ English
  • πŸ‡―πŸ‡΅ ζ—₯本θͺž
HomeLearning CenterSupport CenterAPI References
Discord Community
Slack Community
X / Twitter
πŸ‡ΊπŸ‡Έ English
  • πŸ‡ΊπŸ‡Έ English
  • πŸ‡―πŸ‡΅ ζ—₯本θͺž
  1. Send requests
  • Apidog Learning Center
  • Get started
    • Introduce Apidog
    • Basic concepts in Apidog
    • Navigating Apidog
    • Quick Start
      • Overview
      • Specify a new endpoint
      • Make a request to the endpoint
      • Add an assertion
      • Create a test scenario
      • Share your API documentation
      • Explore more
      • Send a request and save as an endpoint
    • Migration
      • Overview
      • Manual import
      • Scheduled import
      • Import options
      • Export data
      • Import from...
        • Import from Postman
        • Import OpenAPI (Swagger) spec
        • Import cURL
        • Import Markdowns
        • Import from Insomnia
        • Import from apiDoc
        • Import .har file
        • Import WSDL
  • Design APIs
    • Overview
    • Create a new API project
    • Endpoint basics
    • Components
    • Common fields
    • Global parameters
    • Endpoint change history
    • Batch endpoint management
    • Configure multiple request body examples
    • Schemas
      • Generate Schemas from JSON etc.
      • Build a schema
      • Overview
      • Create a new schema
    • Security schemes
      • Overview
      • Create a security scheme
      • Use the security scheme
      • Security scheme in online documentation
    • Advanced features
      • Custom endpoint fields
      • Import endpoints as test steps
      • Endpoint status
      • Appearance of parameter lists
      • Endpoint unique idenfication
  • Develop and Debug APIs
    • Overview
    • Generate requests
    • Send requests
    • Endpoint cases
    • Dynamic values
    • Validate responses
    • Design-first Mode & Request-first Mode
    • Generate code
    • Environments & variables
      • Overview
      • Using variables
      • Environments & services
    • Vault secrets
      • Overview
      • HashiCorp Vault
      • Azure Key Vault
      • AWS Secrets Manager
    • Pre/Post processors
      • Overview
      • Assertion
      • Extract variable
      • Wait
      • Database operations
        • Overview
        • MongoDB
        • Redis
        • Oracle Client
      • Using scripts
        • Overview
        • Postman scripts reference
        • Pre processor scripts
        • Post processor scripts
        • Public scripts
        • Calling other programming languages
        • Using JS libraries
        • Visualizing responses
        • Script examples
          • Assertion scripts
          • Using variables in scripts
          • Using scripts to modify request messages
          • Other examples
    • Dynamic values Modules
  • Mock API data
    • Overview
    • Smart mock
    • Custom mock
    • Mock priority sequence
    • Mock scripts
    • Cloud mock
    • Self-hosted runner mock
    • Mock language (Locales)
  • Automated tests
    • Overview
    • Test reports
    • Test scenarios
      • Create a test scenario
      • Pass data between requests
      • Flow control conditions
      • Import endpoints/endpoint cases from other projects
      • Sync data from endpoints/endpoint cases
      • Export test scenarios
    • Run test scenarios
      • Run a test scenario
      • Data-driven testing
      • Run test scenarios in batch
      • Scheduled tasks
      • Manage the runtime environment of APIs from other projects
    • Test APIs
      • Integration testing
      • Performance testing
      • End-to-end testing
      • Regression testing
    • Apidog CLI
      • Overview
      • Installing and running Apidog CLI
      • Apidog CLI Options
    • CI/CD
      • Overview
      • Integrate with Jenkins
      • Integration with Gitlab
  • Publish API Docs
    • Overview
    • API Technologies Supported
    • Quick share
    • View the API documentation
    • Publish docs sites
    • Folder tree settings
    • Custom layouts
    • Visibility settings
    • Endpoint SEO settings
    • Custom domain
    • Embedding values in document URLs
    • Documentation Search
    • Integrating Google Analytics with Doc Sites
    • CORS Proxy
    • API Versions
      • Overview
      • Create API versions
      • Publish API versions
      • Share endpoints with API versions
  • Send requests
    • Overview
    • gRPC
    • Use request proxy agents for debugging
    • SOAP/WebService
    • GraphQL
    • WebSocket
    • Socket.IO
    • SSE debugging
    • Create requests
      • Request History
      • Request basics
      • Parameters and body
      • Request headers
      • Request settings
      • HTTP/2
    • Authentication and authorization
      • Overview
      • CA and client certificates
      • Authorization types supported by Apidog
      • Digest Auth
      • OAuth 1.0
      • OAuth 2.0
      • Hawk Authentication
      • Kerberos
      • NTLM
      • Akamai EdgeGrid
    • Response and cookies
      • Overview
      • API response in Apidog
      • Create and send cookies
      • Debug requests
      • Save the request as an endpoint
  • Branches
    • Overview
    • Create a new sprint branch
    • Test APIs in a branch
    • Design API in a branch
    • Merge sprint branches
    • Manage sprint branches
  • Apidog MCP Server
    • Overview
    • Conntect API Specification within Apidog Project to AI via Apidog MCP Server
    • Conntect Online API Documentation Published by Apidog to AI via Apidog MCP Server
    • Conntect OpenAPI Files to AI via Apidog MCP Server
  • Best practices
    • How to handle API signatures
    • How to access OAuth 2.0 protected APIs
    • Apidog collaboration workflow
    • Managing authentication state in Apidog
  • Administration
    • Onboarding Checklist
      • Basic Concepts
      • Onboarding Guide
    • Managing Teams
      • Managing Teams
      • Managing Team Members
      • Member Roles & Permission Settings
      • Team Activities
      • Team Resources
        • General Runner
        • Team Variables
        • Request Proxy Agent
      • Real-time Collaborations
        • Team Collaboration
    • Managing Projects
      • Managing Projects
      • Managing Project Members
      • Notification Settings
      • Project Resources
        • Database Connection
    • Managing Organizations
      • Single Sign-On (SSO)
        • SSO Overview
        • Configure Microsoft Entra ID
        • Configure Okta
        • Configure SSO for an Organization
        • Managing user accounts
        • Mapping Groups to Teams
      • SCIM Provisioning
        • Intro to SCIM Provisioning
        • Microsoft Entra ID
        • Okta
      • Organization Resources
        • Self-hosted Runner
  • Billing
    • Overview
    • Credits
    • Unable to use credit cards?
    • Managing subscriptions
    • Upgrade plan
  • Add-ons
    • API Hub
    • Apidog Intellij IDEA plugin
    • Browser Extension
      • Chrome
      • Microsoft Edge
    • Request Proxy
      • Request proxy in Apidog web
      • Request proxy in shared docs
      • Request proxy in Apidog client
  • Account & preferences
    • Language settings
    • Data backup
    • Network proxy configuration
    • Hot keys
    • Updating Apidog
    • Generate OpenAPI access token
    • Deleting account
    • Account settings
  • References
    • API-Design First Approach
    • Apidog OpenAPI Specificaiton Extensions
    • JSONPath
    • XPath
    • Regular Expressions
    • JSON Schema
    • CSV File Format
    • Install Java Environment
    • Runner deployment environment
    • Apidog flavored Markdown
  • Apidog Europe
    • Apidog Europe
  • Support Center
  1. Send requests

WebSocket

WebSocket is an API technology that enables full-duplex communication over a single TCP connection. Compared to traditional HTTP requests, WebSocket offers lower latency and higher efficiency. It is well-suited for scenarios requiring persistent connections and real-time data transmission, such as online gaming, real-time chat, and more.
WebSocket API management is supported in Apidog versions 2.2.34 and later.

Creating a WebSocket endpoint#

You can create a WebSocket endpoint within an HTTP project.
1.
Click the + button on the left and select New WebSocket.
2.
Enter the WebSocket server URL, beginning with ws or wss.
3.
Click Connect.
4.
To disconnect the WebSocket endpoint, click Disconnect.
For the best experience and to utilize the full feature set of the WebSocket API, we recommend using the Apidog client.

Sending Messages#

After establishing a WebSocket connection, you can compose messages under the Message tab.
In addition to directly composing messages in text formats such as Text, JSON, XML, and HTML, you can also compose messages in binary formats using Base64 or Hexadecimal.
The editor will apply syntax highlighting to the message content based on the selected message format. If the message is in JSON, XML, or HTML format, you can also format the input content.

Viewing Messages#

The Messages section below displays the connection status, sent messages, and received messages in chronological order.
Click a single message to view its details on the right:
For text format messages, the formatted message will be displayed by default. You can manually switch the message format and encoding.
For binary format messages, the message's Hexdump will be displayed by default. You can also view the message encoded with Base64 and the original message.

Adding Handshake Request Parameters#

You can customize the parameters required during the WebSocket handshake, such as Params,Headers, and Cookies, to accommodate authentication or other complex scenarios.
Handshake request parameters cannot be modified once the connection is established. They must be configured before establishing the connection or after disconnecting.
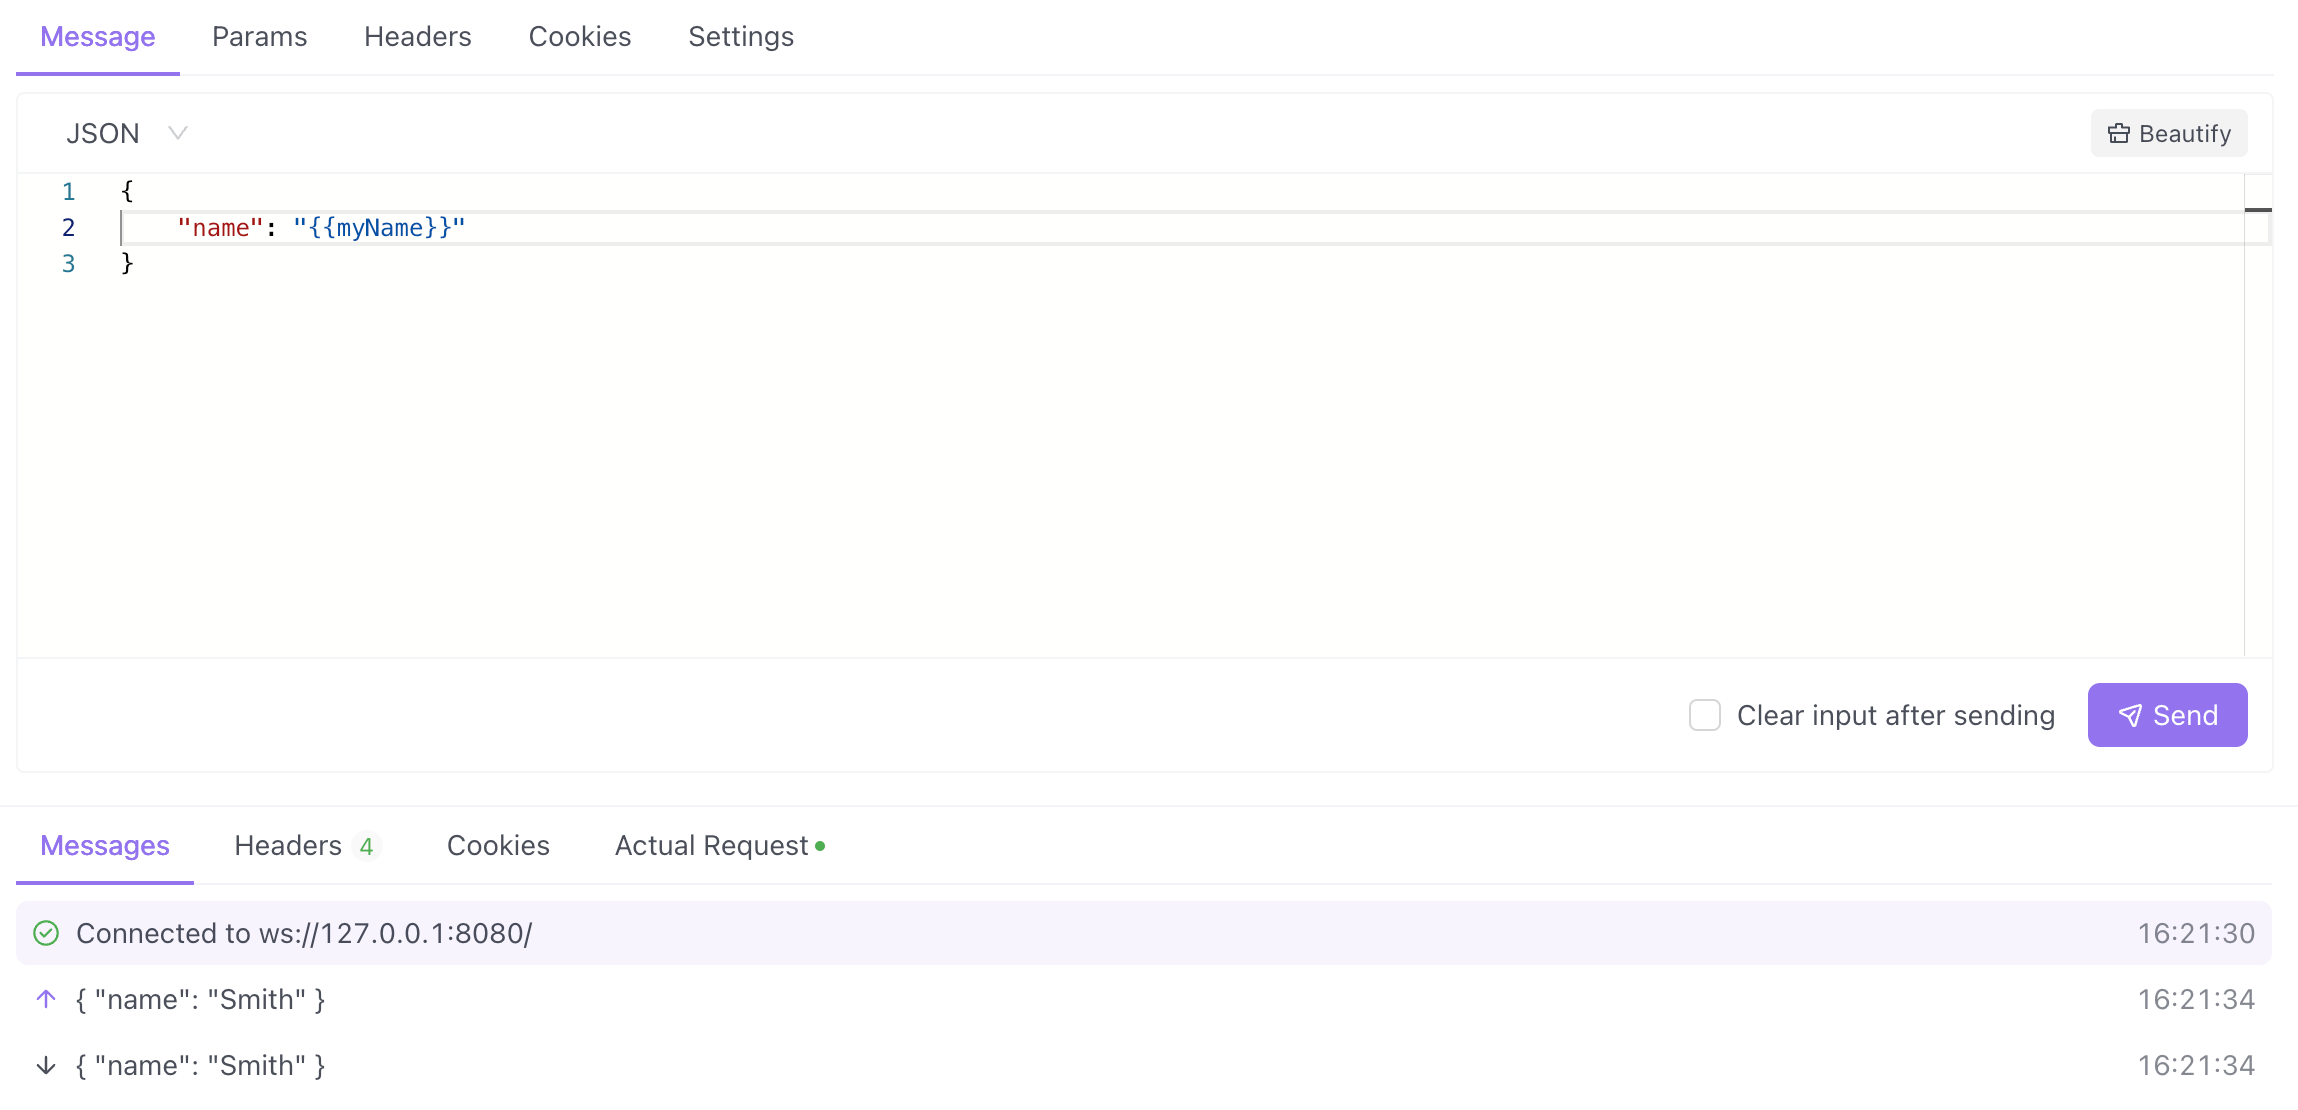
Using Variables#

You can use Apidog variables in the WebSocket connection's handshake and messages. Learn more about Using variables.

API Documentation#

You can set the status, responsible person, and tags for the WebSocket API, and provide a detailed API description in Markdown format.
You can also share the WebSocket API documentation with external teams, who can view it directly in their browser.

Saving the API#

After debugging is complete, click the Save button to save the WebSocket API to the directory tree of the HTTP project. This allows other team members to debug or view the API documentation.

FAQ#

Q: Why is response validation not needed?
A: For WebSocket requests, the HTTP status code must be 101 when establishing a connection, indicating a successful protocol upgrade. Therefore, validating the status code is typically not necessary.
Q: There is no Auth tab. How can I authenticate the WebSocket API?
A: Currently, two methods are recommended for WebSocket API authentication:
1.
Pass the authentication information in a Param, Header, or Cookie field during the connection establishment.
2.
Include the authentication information in a field within a message.
Q: Does Apidog support pre-request/test scripts and assertions in WebSocket APIs?
A: Not yet, but this functionality is currently being designed and developed.
Q: Are request and response examples supported?
A: Not currently, but this feature will be evaluated for future iterations.
Q: Why doesn't the WebSocket API support mocking?
A: The current mocking library does not support WebSocket API definitions and therefore cannot generate message bodies based on the definition.
Modified atΒ 2025-01-27 02:32:30
Previous
GraphQL
Next
Socket.IO
Built with